Lundy - Wandering Perforations Explained In Detail
(Published: May, 2008, Volume 8, Number 2, Issue #25) (Table Of Contents)(Author: Larry Fillion)
In January, 2008, I exhibited an OFE (One Frame Exhibit) of the Lundy Ant-Malaria issues and cancellation at AmeriStamp 2008.
I received a written review from the primary judge for my exhibit (Jay Stotts) and also Tim Bartshe and John Hotchner
reviewed my exhibit - just a couple of great philatelists, exhibitors, ... people.
There were lots of comments but for this article, I will focus on one issue in regards to the wandering perforations:
"How did this occur? What type of perforator machine - harrow, comb?" (John Hotchner did lead me in the right direction that it
was a comb perforator but that meant nothing to me to I had some reading to do.
For preparing the exhibit, I read and studied two articles that were printed in old Miasma journals from the 80s. These articles first appeared in the Lundy Collectors Club Quarterly Journal and the organization was kind enough to allow the MPI to reprint them. The original authors were Roger S. Cichora and Barry Chinchen.
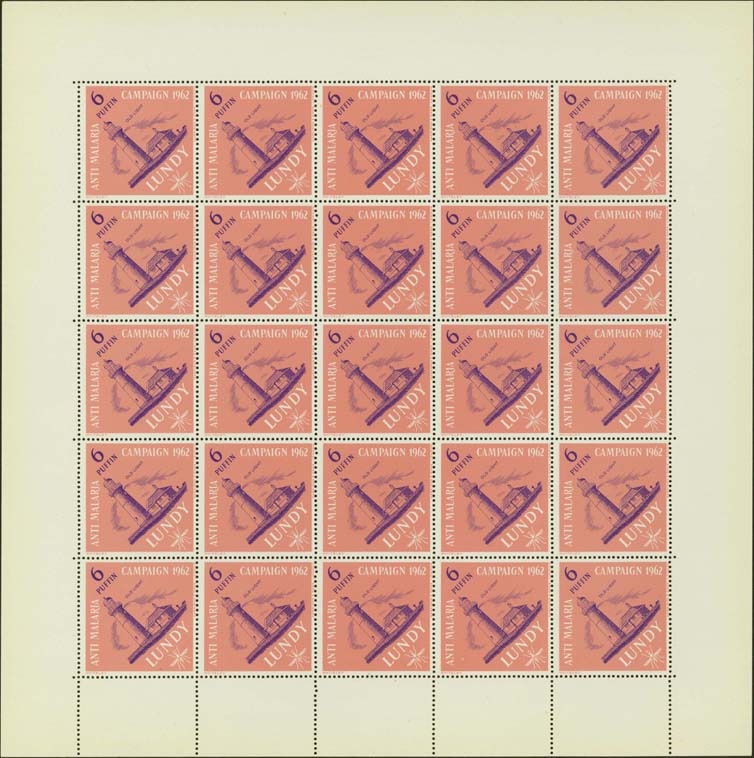
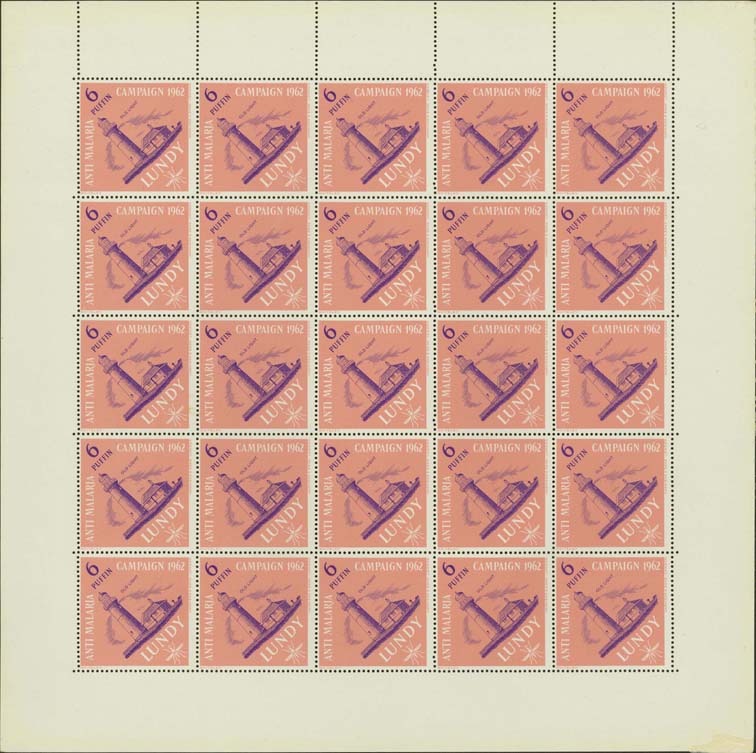
The first article in the Jan-March, 1982 (Issue No. 9) Miasma and is 6 pages long. There is a paragraph stating that the sheets contained 50 stamps and they were cut in 2 panes (5 x 5 stamps ) with a top and a bottom pane. The upper pane has the vertical perforation rows through the bottom margin selvage and the bottom pane has the vertical perforation rows through the top margin selvage.
The second article in the July-Sept, 1983 (Issue No. 15) Miasma is a one page article describing the 'misaligned perforations' in two different sheets. One sheet had the misaligned perforations in the 2nd row and the other has them in the third. (The article mentions that there are two different types of sheets but should have been written as panes.) I have also heard the 'misaligned perforations' called wandering perforations which is what I will call them.
This new on-line article will focus on how the two different wandering perforations were produced. This will be resolved at the bottom of the article but first some images of the panes and perforations.
The top pane and the bottom pane are shown below. The top pane has the vertical perforation rows through the bottom margin selvage and the bottom pane has the vertical perforation rows through the top margin selvage.
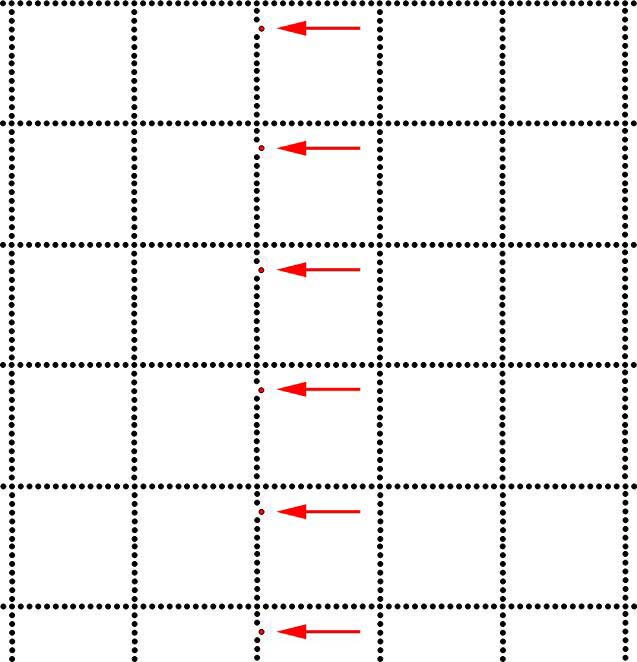
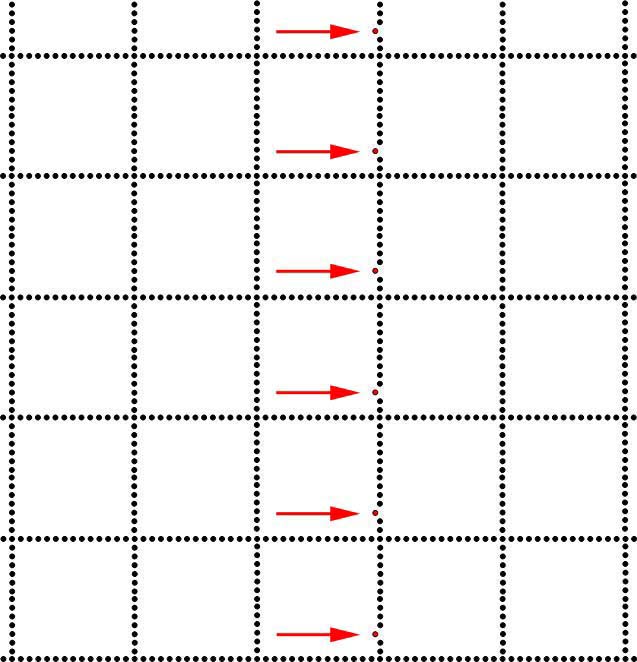
Below are the diagrams of the perforation holes including the 'wandering' perforation.
(The exact number of perforations are not shown but the diagram should be a guide)
Here are close-ups of the two different wandering perforations.
In "Fundamentals of Philately" written by L.N. Williams, there are over 100 pages on separation. There was a detailed section on comb-perforators. A single-comb perforator perforates the long row of perforations along with the perforations between the stamps vertically. The perforations appear to look like a comb which is where the name comes from. Below is a picture of what would be perforated before the sheet is moved into position for the next row.

The red dot in the image above in between the 2nd and 3rd stamp is the wandering perforation. This was caused by a pin that was misaligned and after the paper is moved into position for the second row to be perforated, the wandering perforation continues down the row.
So, there is only one question left: "Why is the wandering perforation in two different positions on different panes?" The reason for this is that after the sheets of 50 were cut into two panes of 25, the bottom pane were placed into the single-comb perforator with the stamps with value in the bottom right, not the top left. This is also explains why the bottom pane has the vertical perforation rows through the top margin selvage.
*If any reader has more information on the wandering perforations, please contact me at malariastamps@yahoo.com
For preparing the exhibit, I read and studied two articles that were printed in old Miasma journals from the 80s. These articles first appeared in the Lundy Collectors Club Quarterly Journal and the organization was kind enough to allow the MPI to reprint them. The original authors were Roger S. Cichora and Barry Chinchen.
The first article in the Jan-March, 1982 (Issue No. 9) Miasma and is 6 pages long. There is a paragraph stating that the sheets contained 50 stamps and they were cut in 2 panes (5 x 5 stamps ) with a top and a bottom pane. The upper pane has the vertical perforation rows through the bottom margin selvage and the bottom pane has the vertical perforation rows through the top margin selvage.
The second article in the July-Sept, 1983 (Issue No. 15) Miasma is a one page article describing the 'misaligned perforations' in two different sheets. One sheet had the misaligned perforations in the 2nd row and the other has them in the third. (The article mentions that there are two different types of sheets but should have been written as panes.) I have also heard the 'misaligned perforations' called wandering perforations which is what I will call them.
This new on-line article will focus on how the two different wandering perforations were produced. This will be resolved at the bottom of the article but first some images of the panes and perforations.
The top pane and the bottom pane are shown below. The top pane has the vertical perforation rows through the bottom margin selvage and the bottom pane has the vertical perforation rows through the top margin selvage.
|
|
Below are the diagrams of the perforation holes including the 'wandering' perforation.
(The exact number of perforations are not shown but the diagram should be a guide)
The wandering perforation is in the 2nd row (Top Pane of 25)
|
The wandering perforation is in the 3rd row (Bottom Pane of 25)
|
Here are close-ups of the two different wandering perforations.
|
wandering perforation (in the 2nd row) |
wandering perforation (in the 3rd row) |
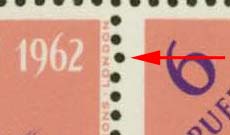
|
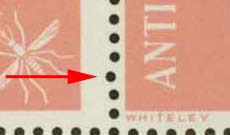
|
In "Fundamentals of Philately" written by L.N. Williams, there are over 100 pages on separation. There was a detailed section on comb-perforators. A single-comb perforator perforates the long row of perforations along with the perforations between the stamps vertically. The perforations appear to look like a comb which is where the name comes from. Below is a picture of what would be perforated before the sheet is moved into position for the next row.

The red dot in the image above in between the 2nd and 3rd stamp is the wandering perforation. This was caused by a pin that was misaligned and after the paper is moved into position for the second row to be perforated, the wandering perforation continues down the row.
So, there is only one question left: "Why is the wandering perforation in two different positions on different panes?" The reason for this is that after the sheets of 50 were cut into two panes of 25, the bottom pane were placed into the single-comb perforator with the stamps with value in the bottom right, not the top left. This is also explains why the bottom pane has the vertical perforation rows through the top margin selvage.
*If any reader has more information on the wandering perforations, please contact me at malariastamps@yahoo.com

